UEFI SecureBoot on Debian
This post explains how to enable UEFI SecureBoot on Debian, using your own trust chain. The technical part itself is very light, most of the post is explanations and what and why.
What is SecureBoot ?
UEFI SecureBoot is a mechanism to verify a cryptographic signature of UEFI Images before loading them into the Firmware (the new name for the BIOS1). This provides a way to control which images are allowed, and also drivers and option ROM used by the Firmware, and to fight bootkits and malwares based on that. For an example of such dangers, see my past presentations on malicious UEFI Option ROMs ([FR] at SSTIC, and [EN] at PacSec).
Roughly, SecureBoot will rely on cryptographic signatures (mainly using SHA-256 and RSA-2048) that are embedded into files using the Authenticode file format. The integrity of the executable is verified by checking the hash, and the authenticity and the trust by checking the signature, based on X.509 certificates, which has to be trusted by the platform.

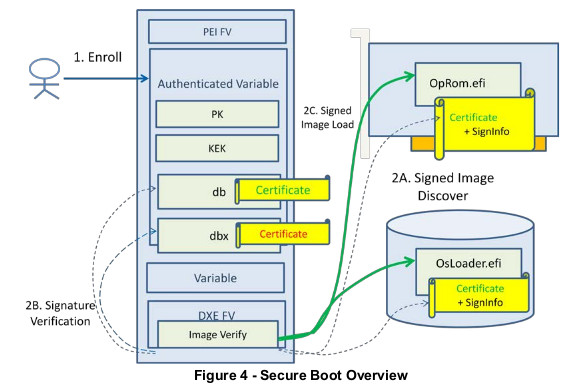
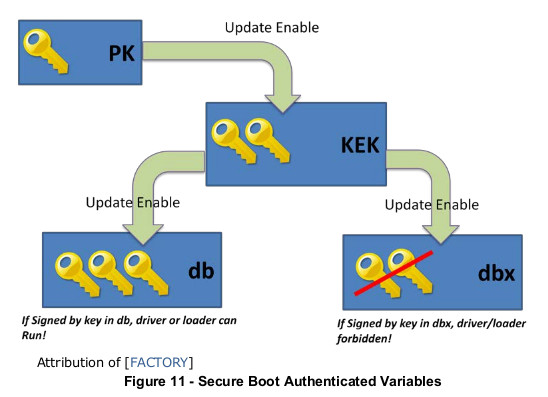
At a high level, the Firmware has 4 different set of objects (see figures for details):

- the Platform Key (PK): this is the main key. This keys, usually belonging to the platform owner, controls if the ownership can be changed, or if other keys can be modified.
- The Key Exchange Key (KEK): these keys control which certificates can be used to sign images.
- The Authorized Signatures Database (DB): this database contains authorized signing certificates, but also some hashes. Any image, either signed with a certificate enrolled in DB, or having a hash stored in DB, will be allowed to boot.
- The Forbidden Signature Database (DBX): this database stores forbidden certificates and images hashes. Any Image listed here will never be allowed to run (even if also listed in DB).
PK and KEK keys are Certificate Authorities. There can be several KEKs, but they must be signed by the PK. On a typical system, the PK is owned by the manufacturer, as well as one of the KEKs. Another KEK belongs to Microsoft (so the system can boot Windows by default), and that’s it.
So, why would you want SecureBoot ? Because it’s a good thing in the general intention (it protects you from malwares), but only if the OEM does grant you the ability to add/change/modify the Certificate Authorities. It improves the trust in the boot sequence, and brings you more control over it.
For more details, see the UEFI specifications, and the Linux Foundation Whitepaper about UEFI Secure boot.
Installing the tools
The sbsigntools and efitools packages are required. Unfortunately, they are not yet in the
Debian mainstream distribution. I have created some packages and have submitted them, at the moment
of the writing of this post they are currently sitting in NEW.
In the meantime, you can use the packages from the openSUSE build system, or build them from the sources. The sbsigntool git tree can be found here, and the efitools git tree is here.
For EfiTools, you can also use the UEFI keytool USB image from James Bottomley’s website called sb-usb.img (md5sum 7971231d133e41dd667a184c255b599f).
Configuring SecureBoot
There are two possibilities for SecureBoot:
- you trust the OEM and Microsoft authorities (or, your device does not allow going back to Setup Mode)
- you trust only your own CA
The first case is not described here. It means using shim, which is a bootloader signed by a certificate issued by Microsoft, to chain with your own bootloader. This is mostly useful in case of dual-boot, or when you don’t have your own CA. In my case, the goal sto fully control what can boot or not on my device, and check its integrity, so I will only describe the second case.
Prerequisites
Before going further, there are some checks to be done:

- Obviously, the Firmware must support UEFI and SecureBoot.
- The Firmware must support Setup Mode, or at least clearing the keys. If it does not, there is no point running your own CA, using shim will be enough, since any executable signed by Microsoft or your OEM will be able to boot2.
- A PKI, and a way to manage (generate and sign) your X.509 certificates.
Note that this is likely to be easier on laptops, because all drivers are embedded in the image. On a desktop, it is probable that external drivers (especially Option ROMs for devices such as graphics card) will need to be signed.
Set a Firmware password
First, you need to lock the settings of the Firmware, and make sure that SecureBoot cannot be disabled. To do this, setting a password (at least admin) to the Firmware is required.
Generate the certificates
Three certificates are required:
- the PK
- the KEK
- the boot certificate
This part is not covered here. If you have your own Certificate Authority, then you should be able to generate your certificates easily.
If you don’t, here’s how to generate a few self-signed X.509 certificates for testing:
umask 0077
# create a PK key
openssl req -new -x509 -newkey rsa:2048 -subj "/CN=my PK name/" -keyout PK.key -out PK.crt -days 3650 -nodes -sha256
# create a KEK key
openssl req -new -x509 -newkey rsa:2048 -subj "/CN=my KEK name/" -keyout KEK.key -out KEK.crt -days 3650 -nodes -sha256
# create a db key
openssl req -new -x509 -newkey rsa:2048 -subj "/CN=my db name/" -keyout db.key -out db.crt -days 3650 -nodes -sha256
Convert them to the correct format, put them on a USB drive
Convert the certificates to the expected format:
$ cert-to-efi-sig-list /tmp/CA/PK.crt /tmp/CA/PK.esl
$ cert-to-efi-sig-list /tmp/CA/KEK.crt /tmp/CA/KEK.esl
$ cert-to-efi-sig-list /tmp/CA/boot0.crt /tmp/CA/db.esl
Establish the trust chain: the PK will be self-signed, the KEK will be signed by the PK, and the boot certificate will be signed by the KEK
$ sign-efi-sig-list -k PK.key -c PK.crt PK /tmp/CA/PK.esl /tmp/PK.auth
$ sign-efi-sig-list -k PK.key -c PK.crt KEK /tmp/CA/KEK.esl /tmp/CA/KEK.auth
$ guid=$(uuidgen)
$ sign-efi-sig-list -k KEK.key -c KEK.crt $guid /tmp/CA/db.esl /tmp/CA/db.auth
$ ./cert-to-efi-sig-list dbx.esl
Copy the keys (the public parts only) to a USB drive, and save the private parts elsewhere (in a safe location).
Now, we’ll use the boot certificate key to sign boot images.
Option 1: create a UEFI Linux kernel
Note that you don’t really need a bootloader: the kernel image
can be compiled as a UEFI Image (CONFIG_EFI_STUB). However, in that case, there is no support for
an external initramfs, so you need to embed a pre-built cpio image (using the
CONFIG_INITRAMFS_SOURCE option).
Option2: create a standalone (non-modular) grub2
We now need to sign the bootloader. While this is a simple operation, it will not work as-is with the default Debian installation: Grub, when it detects that SecureBoot is enabled, will refuse to load modules from the disk.
There is no support in Grub to support a signature + verification module, so a workaround is to create a Grub executable with all required modules embedded.
Create a file modules_grub, with the following content:
minicmd
help
gfxterm_background
video_colors
bitmap_scale
search
search_label
search_fs_file
search_fs_uuid
password_pbkdf2
pbkdf2
gcry_sha512
all_video
video_cirrus
video_bochs
loadenv
disk
test
fat
lzopio
xzio
gzio
png
bitmap
gfxterm
font
bufio
efi_uga
efi_gop
video
video_fb
ext2
fshelp
part_gpt
normal
boot
extcmd
crypto
terminal
gettext
echo
linux
linuxefi
The content of this file was created by try-and-fail, so you may need to adapt it to your configuration.
Install Grub, embedding these modules to the resulting executable:
# grub_modules="$(cat modules_grub)"
# grub-install --uefi-secure-boot --modules="$grub_modules"
Sign the Grub executable:
$ sudo sbsign --key boot0.key --cert boot0.crt /boot/efi/EFI/debian/grubx64.efi
$ sudo mv /boot/efi/EFI/debian/grubx64.efi.signed /boot/efi/EFI/debian/grubx64.efi
Note: you will need to sign the Grub executable every time grub is reinstalled (but not when only the configuration is changed).
Optional: sign a UEFI shell, put it on a USB drive
To make things easier to maintain, I also signed a local version of the EDK2 UEFI Shell. This shell will not be present on the boot partition, but it can be useful to keep a USB drive with a bootable shell (for recovery). You can also add a local Grub installation on this key, for example.
Remember that SecureBoot will verify signatures of all executables (not only the first). This means that if you use the shell to run other programs, these programs also need to be signed.
Configure the Firmware
Reboot, and enter your Firmware configuration. These steps vary from one Firmware to another, so here are listed the important steps:
- disable the CSM (Compatibility Support Module)
- disable legacy boot support, enable UEFI only
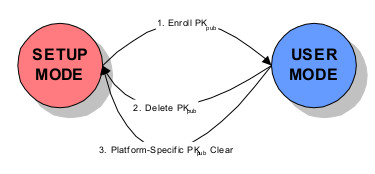
- go into Setup Mode and/or clear all certificates
SecureBoot is not enabled now if you need to reboot to setup the keys.
Setup certificates
Some Firmwares have menus to add/remove keys (it’s not the case for me). Another solution is to use efitools to configure the keys from the UEFI shell.
Add the executables to the USB drive. You will need at least KeyTool.efi, the other executables
are not used here.
On my laptop, Setup Mode is only available the first boot after setting the option (which is a good
thing). Run KeyTool.efi, and then:
- add the PK
- add the KEK
- add the DB
- add the empty dbx file
Profit!
On the next reboot, enable SecureBoot in the Firmware, and then your Firmware should only load signed images, with a trusted certificate.
If something goes wrong, reboot and disable SecureBoot.
And now ?
This is only the beginning of the trust chain! To achieve full boot integrity, all elements from the boot sequence must support integrity checks.
For example, if the bootloader does not check the integrity of the kernel image, or the initramfs, then this image could easily be compromised. After the boot, if the kernel does not check the modules it will load, then it could also be compromised.
The following points are not mutually exclusive, but more parts of a complete solution:
- the TPM: The Trusted Platform Module (TPM) is one possible solution: by sealing a key to the values of some measurements, this can tie, for example, the extraction of the disk encryption key to the fact that the expected values were found. This, however, requires a modified bootloader and some additions to the initramfs. I may post something about that in the future.
- Kernel signed modules: since Linux kernel version 3.7, support has been added for signed kernel
modules (
CONFIG_MODULE_SIGandCONFIG_MODULE_SIG_FORCE). This allows further hardening of the system by disallowing unsigned kernel modules, or kernel modules signed with the wrong key, to be loaded. See Signed kernel module support for more details.
